
상권's
TIL 31 (Linux 권한, 환경 변수, MySQL) (2021.11.08) 본문
-오늘의 코플릿 2021.11.08-
// 아래와 같은 과정을 거쳐 부등호 수(inequalityNumber)를 만들 수 있습니다.
// 최대 9개의 부등호(<, >)가 주어집니다.
// 부등호의 좌우에는 0부터 9사이의 숫자가 한 번씩만 들어가야 합니다.
// 부등호를 만족하는 숫자의 조합을 차례대로 이어 붙여 만든 정수를 부등호 수라고 한다.
// 부등호 기호들을 입력받아 부등호를 만족하는 최대 부등호 수와 최소 부등호 수의 차이를 리턴해야 합니다.
최대 부등호 수와, 최소 부등호 수의 차이...
maxNum과 minNum을 구한다.
maxNum은 부등호가 > 일때, 제일 처음에 98가 들어온다 && < 일 때, 89가 들어온다.
minNum은 부동호가 > 일때, 10이 들어온다. < 일때 01이 들어온다.
먼저 signs를 split(' ')로 만들어서 배열로 만든다.
배열에서 하나씩 빼면서 진행을 한다.
maxNum과 minNum은 함수로 만든다.
첫 수도코드 => 인자로 받는 값을 배열로 만들어서 하나씩 뺴면서 추가를 해보면 어떨지에 대해서 고민해봤습니다. 처음에 등장하는 부등호에 대해서 출력되는 값은 정해놓은 뒤, 추가를 해보려고 했지만, 생각했던 거만큼의 구현은 어려웠습니다. 구글링을 통해서 방법을 이해하고 아래와 같이 코드를 구현해봤습니다.
코드는 이해가 되지만, 이런 코드를 구현할 수 있을지는.. 자신은 없습니다.. 추후에 계속해서 반복하면서 방법을 익혀서 다음에는 직접 구현할 수 있도록 노력해야겠습니다.
const inequalityNumber = function (signs) {
const getMaxNumber = (signs, numArr) => {
  let max = '';
  for ( let n = 0; n < signs.length; n++ ) {
    if(signs[n] === '>') {
      max += String(numArr.pop())
    }
    else {
      let count = 1;
      for ( let i = n + 1; i < signs.length; i++ ) {
        if ( signs[i] === '<' ) {
          count++
        } else break;
      }
      max += String(numArr.splice(numArr.length - 1 - count, 1))
    }
  }
  max += numArr.pop()
  return max
}

const getMinNumber = (signs, numTable) => {
  let min = '';
  for (let i = 0; i < signs.length; i++) {
    if (signs[i] === '<') {
      min += String(numTable.shift())
    } else {
      let count = 1;
      for (let j = i + 1; j < signs.length; j++) {
        if (signs[j] === '>') count++
        else break
      }
      min += String(numTable.splice(count, 1))
    }
  }
  min += numTable.shift()
  return min
}

  signs = signs.split(' ')
  let number = [0, 1, 2, 3, 4, 5, 6, 7, 8, 9]
  const answer = getMaxNumber(signs, number.slice()) - getMinNumber(signs, number.slice())
  return answer
}
파일이나 폴더의 Read, Write, Execute 권한
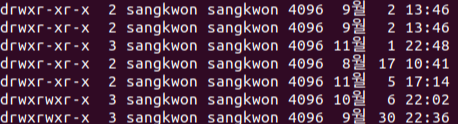
터미널을 열고 프롬프트에
ls -l입력할 경우 위와 같은 출력을 만날 수 있습니다. 왼쪽 첫번째 표현은 아래와 같은 방식으로 해당 폴더나, 파일에 대한 권한을 나타냅니다.

표현의 첫 시작인 - 와 d 는 각각 not directory와 directory를 나타냅니다. 폴더이면 d로, 파일이면 - 로 나타냅니다.
이어지는 r, w, x는 각각 read permission, write permission, execute permission으로 읽기 권한, 쓰기 권한, 실행 권한을 나타냅니다.
3번에 걸쳐 나타나는 이유는 사용자와 그룹, 나머지에 대한 권한을 표시하기 때문입니다.(user, group, and other)
user : 파일의 소유자입니다. 기본적으로 파일을 만든 사람이 소유자가 됩니다. 따라서 user를 소유자라고 하기도 합니다.
group : group에는 여러 user가 포함될 수 있습니다. 그룹에 속한 모든 user는 파일에 대한 동일한 group 액세스 권한을 갖습니다. 많은 사람이 파일에 액세스해야 하는 프로젝트가 있다고 가정합니다. 각 user에게 일일이 권한을 할당하는 대신에 모든 user를 group에 추가하고, 파일에 group 권한을 할당할 수 있습니다.
other : 파일에 대한 액세스 권한이 있는 다른 user입니다. 파일을 만들지 않은 다른 모든 user를 의미합니다. 따라서 other 권한을 설정하면, 해당 권한을 global 권한 설정이라고 볼 수도 있습니다.
chmod: 권한을 변경하는 명령어
명령어 chmod 폴더나 파일의 읽기, 쓰기, 실행 권한을 변경할 수 있습니다. OS에 로그인한 사용자와, 폴더나 파일의 소유자가 같을 경우에 명령어 chmod 로 폴더나 파일의 권한을 변경할 수 있습니다. 만약 OS에 로그인한 사용자와, 폴더나 파일의 소유자가 다를 경우에는 관리자 권한을 획득하는 명령어 sudo 를 이용해 폴더나 파일의 권한을 변경할 수 있습니다.
명령어 chmod 로 권한을 변경하는 방식은 두 가지가 있습니다.
- 첫 번째는 더하기(+), 빼기(-), 할당(=)과 액세서 유형을 표기해서 변경하는 Symbolic method입니다.
- 두 번째는 rwx를 3 bit로 해석하여, 숫자 3자리로 권한을 표기해서 변경하는 Absolute form입니다.
Symbolic method는 액세스 클래스, 연산자, 액세스 타입으로 구분합니다.
Access classOperatorAccess Type
| u (user) | + (add access) | r (read) |
| g (group) | - (remove access) | w (write) |
| o (other) | = (set exact access) | x (execute) |
| a (all: u, g, and o) |
chmod g-r filename # removes read permission from group
chmod g+r filename # adds read permission to group
chmod g-w filename # removes write permission from group
chmod g+w filename # adds write permission to group
chmod g-x filename # removes execute permission from group
chmod g+x filename # adds execute permission to group
chmod o-r filename # removes read permission from other
chmod o+r filename # adds read permission to other
chmod o-w filename # removes write permission from other
chmod o+w filename # adds write permission to other
chmod o-x filename # removes execute permission from other
chmod o+x filename # adds execute permission to other
chmod u+x filename # adds execute permission to user

chmod a=rw helloworld.js # -rw-rw-rw-
chmod u= helloworld.js # ----rw-rw-
chmod a+rx helloworld.js # -r-xrwxrwx
chmod go-wx helloworld.js # -r-xr--r--
chmod a= helloworld.js # ----------
chmod u+rwx helloworld.js # -rwx------
Absolute form은 숫자 7까지 나타내는 3 bits의 합으로 표기합니다.
사용자, 그룹, 또는 다른 사용자나 그룹마다 rwx 가 나타나고, 각 영역의 boolean 값으로 표기할 수 있습니다.
PermissionNumber
| Read (r) | 4 |
| Write (w) | 2 |
| Execute (x) | 1 |
만약, user는 rwx 를, group과 other은 r-- 로 권한을 변경하려고 한다면, 위 표에 나와있는 숫자의 합을 user, group, other 순으로 입력하여 사용합니다.
# u=rwx (4 + 2 + 1 = 7), go=r (4 + 0 + 0 = 4)
chmod 744 helloworld.js # -rwxr--r--
Absolute form에서 사용하는 숫자는 다음의 표를 참고하세요.
#SumrwxPermission
| 7 | 4(r) + 2(w) + 1(x) | rwx | read, write and execute |
| 6 | 4(r) + 2(w) + 0(-) | rw- | read and write |
| 5 | 4(r) + 0(-) + 1(x) | r-x | read and execute |
| 4 | 4(r) + 0(-) + 0(-) | r-- | read only |
| 3 | 0(-) + 2(w) + 1(x) | -wx | write and execute |
| 2 | 0(-) + 2(w) + 0(-) | -w- | write only |
| 1 | 0(-) + 0(-) + 1(x) | --x | execute only |
| 0 | 0(-) + 0(-) + 0(-) | --- | none |
Linux 기반의 운영체제의 PC에는 시스템 자체에 전역변수를 설정할 수 있으며, 시스템에 설정한 전역변수를 환경변수라고 합니다.
export: 환경변수 확인하기 && 환경변수 임시 적용
터미널에 명령어 export 를 입력해, 기록된 환경변수를 확인할 수 있습니다.
명령어 export 를 이용하면, 새로운 환경변수를 추가할 수 있습니다.
다음과 같이 새로운 환경변수 urclass="is good" 을 설정합니다. 이 때 등호 표시(Equal sign, =) 앞뒤에는 반드시 공백이 없어야 합니다.
export urclass="is good"명령어 echo 와 함께 환경변수를 입력하면, 환경변수의 값을 확인할 수 있습니다. 이때 환경변수의 앞에는 달러사인($)을 입력하여, 변수라는 뜻을 터미널에 전달합니다.
dotenv: 자바스크립트에서 환경변수 사용하기
npm 모듈 dotenv를 사용하면, 자바스크립트에서 환경변수를 사용할 수 있습니다.
npm 모듈을 설치하고 사용하기 위해서, 새로운 폴더를 만들고 npm init 을 입력합니다. 그리고 npm i dotenv 를 입력해 모듈을 설치합니다. 이때 생성된 폴더는 설치할 모듈과 이름이 같아서는 안됩니다.
mkdir environment_variable
cd environment_variable
npm init # 엔터 키를 여러번 입력해 init을 마칩니다.
npm i dotenv # dotenv 모듈을 설치합니다.
설치한 dotenv를 이용해 환경변수에 접근할 수 있습니다. 새로운 파일 index.js를 생성하고, process.env 를 출력합니다. Node.js의 내장 객체 process.env를 이용하면, 명령어 export 로 확인한 내용과 동일한 내용을 객체로 출력합니다.
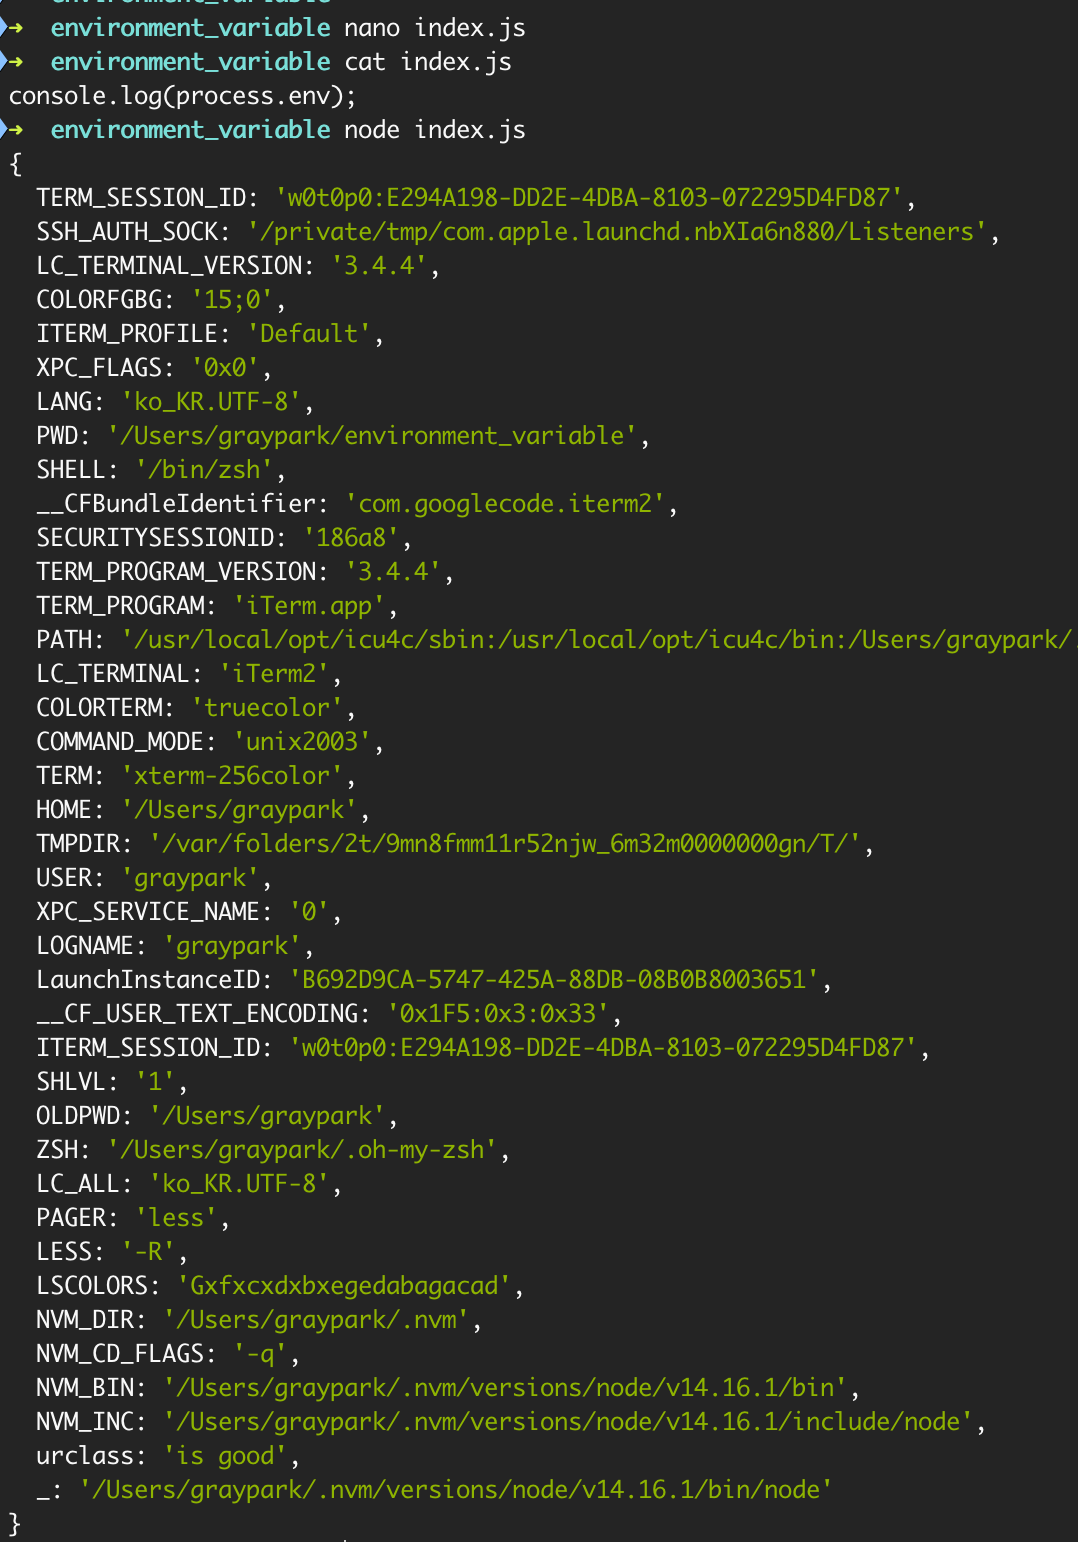
- process.env 는 Node.js 환경에서 조회할 수 있습니다.
- dotenv는 이어지는 콘텐츠 .env 파일를 환경변수로 사용할 수 있게 돕습니다.
.env: Node.js에서 환경변수 영구 적용
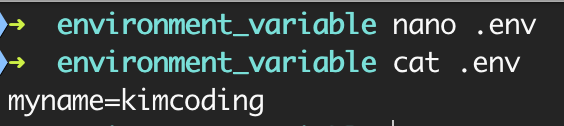
명령어 export 로 적용한 환경변수는 현재 사용 중인 터미널에서만 임시로 사용이 가능합니다. 환경변수를 Linux 운영체제에 저장하는 방법은 여러 가지가 있지만, Node.js에서는 파일 .env를 만들어 저장하는 방법을 사용합니다.
먼저 .env 파일을 생성하고, 사용하고자 하는 환경변수를 입력한 뒤 저장합니다.
모듈 dotenv를 이용하면, 파일 .env에 저장한 환경변수를 조회할 수 있습니다. index.js를 다음과 같이 수정하고, 저장합니다.
const dotenv = require("dotenv");
dotenv.config();
console.log(process.env.myname);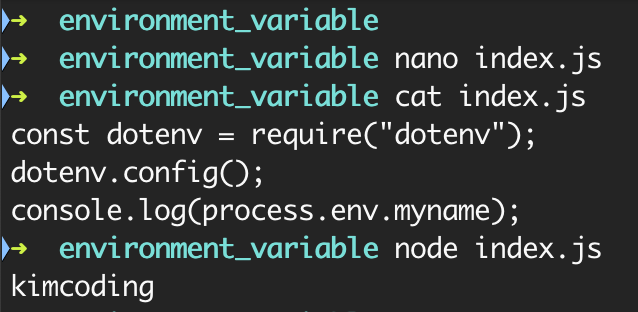
환경변수를 이용해 API key, DB password와 같이 민감한 정보를 저장하고 관리할 수 있습니다. 그뿐만 아니라 서로 다른 PC 또는 여러 .env 파일에서, 같은 변수 이름에 다른 값을 할당할 수 있습니다.
실제 제품(서비스)을 개발하는 과정에는 개발 환경(local 또는 development 등)과 테스트 서버의 환경(test), 그리고 실제 제품을 제공하는 환경(production)이 있습니다.
예를 들어 구글 API를 이용해 웹 애플리케이션을 만드는 경우, 개발 환경에서는 개발자 개인의 API 키를 이용할 수 있습니다. 그러나 제품을 서비스할 때에 개인 API 키를 사용하면, 일일 요청량을 초과하는 경우 제품이 정상적인 동작을 할 수 없습니다. 이런 경우를 방지하기 위해 실제 제품에서는 기업용 API 키를 사용합니다.
이처럼 개발 환경과 제품을 제공하는 환경에서 사용하는 API 키가 다른 경우, 환경변수를 이용해 환경을 구분하여 코드를 작성할 수 있습니다.
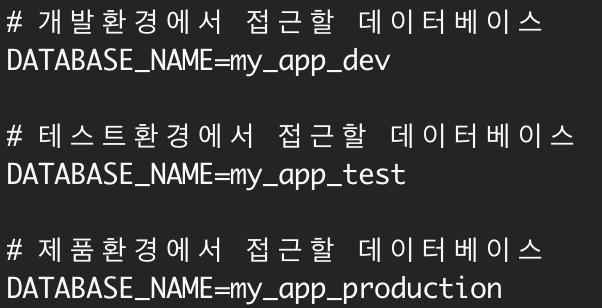
데이터베이스도 마찬가지로 개발, 테스트, 제품 환경으로 구분할 수 있습니다. 다음 그림은 각기 다른 환경에, 같은 변수 이름을 사용하여 데이터베이스를 구분한 예시입니다.
MySQL이란? 출처
MySQL은 가장 널리 사용되고 있는 관계형 데이터베이스 관리 시스템(RDBMS: Relational DBMS)입니다.
MySQL은 오픈 소스이며, 다중 사용자와 다중 스레드를 지원합니다.
또한, C언어, C++, JAVA, PHP 등 여러 프로그래밍 언어를 위한 다양한 API를 제공하고 있습니다.
MySQL은 유닉스, 리눅스, 윈도우 등 다양한 운영체제에서 사용할 수 있으며, 특히 PHP와 함께 웹 개발에 자주 사용됩니다. MySQL은 오픈 소스 라이센스를 따르기는 하지만, 상업적으로 사용할 때는 상업용 라이센스를 구입해야만 합니다.
MySQL의 장점
1. 오픈 소스 라이센스를 따르기 때문에 무료로 사용할 수 있습니다.
2. 다양한 운영체제에서 사용할 수 있으며, 여러 가지의 프로그래밍 언어를 지원합니다.
3. 크기가 큰 데이터 집합도 아주 빠르고 효과적으로 처리할 수 있습니다.
4. 널리 알려진 표준 SQL 형식을 사용합니다.
5. MySQL 응용 프로그램을 사용자의 용도에 맞게 수정할 수 있습니다.
mySQL 설치하는 방법(우분투)
아래의 순서대로 입력을 하면 MySQL을 다운로드 받을 수 있습니다.
맨 아래의 코드가 다운 받은 다음 데이터베이스 서버에 접속하기 위해 비밀번호를 입력하는 코드인데,
입력하게 되면 비밀번호를 누르라고 합니다. 설치할 때에 따로 입력한 부분이 없다면 엔터만 쳐도 접속할 수 있습니다.
sudo apt-get update

sudo apt-get install mysql-server

mysql -uroot -p
엔터를 치게 되면 MySQL monitor에 접속을 했다고 출력이 됩니다.
=> MySQL 데이터베이스 클라이언트 중 하나( CLI 명령어 기반)
비밀번호를 엔터로 둘 수 없으니 아래에서 두 번째 코드를 입력하고 '이용할 비밀번호'에 사용할 비밀번호를 입력하면 됩니다.
성공적으로 변경되었을 때, 맨 아랫줄 코드가 출력됩니다.
sangkwon@sangkwon-ZenBook-UX534FAC-UX534FA:~$ sudo mysql -uroot -p
Enter password:

Welcome to the MySQL monitor.  Commands end with ; or \g.
Your MySQL connection id is 11
Server version: 8.0.27-0ubuntu0.20.04.1 (Ubuntu)

Copyright (c) 2000, 2021, Oracle and/or its affiliates.

Oracle is a registered trademark of Oracle Corporation and/or its
affiliates. Other names may be trademarks of their respective
owners.

Type 'help;' or '\h' for help. Type '\c' to clear the current input statement.

mysql> ALTER USER 'root'@'localhost' IDENTIFIED WITH mysql_native_password BY '이용할 비밀번호';
Query OK, 0 rows affected (0.01 sec)
mySQL에서 사용 가능한 명령어
List of all MySQL commands:
Note that all text commands must be first on line and end with ';'
?         (\?) Synonym for `help'.
clear     (\c) Clear the current input statement.
connect   (\r) Reconnect to the server. Optional arguments are db and host.
delimiter (\d) Set statement delimiter.
edit      (\e) Edit command with $EDITOR.
ego       (\G) Send command to mysql server, display result vertically.
exit      (\q) Exit mysql. Same as quit.
go        (\g) Send command to mysql server.
help      (\h) Display this help.
nopager   (\n) Disable pager, print to stdout.
notee     (\t) Don't write into outfile.
pager     (\P) Set PAGER [to_pager]. Print the query results via PAGER.
print     (\p) Print current command.
prompt    (\R) Change your mysql prompt.
quit      (\q) Quit mysql.
rehash    (\#) Rebuild completion hash.
source    (\.) Execute an SQL script file. Takes a file name as an argument.
status    (\s) Get status information from the server.
system    (\!) Execute a system shell command.
tee       (\T) Set outfile [to_outfile]. Append everything into given outfile.
use       (\u) Use another database. Takes database name as argument.
charset   (\C) Switch to another charset. Might be needed for processing binlog with multi-byte charsets.
warnings  (\W) Show warnings after every statement.
nowarning (\w) Don't show warnings after every statement.
resetconnection(\x) Clean session context.
데이터베이스 및 테이블 관리
1. opentutorial이라는 이름의 스키마 만들기
mysql> CREATE DATABASE opentutorial;
Query OK, 1 row affected (0.01 sec)

2. opentutorial 스키마 삭제하기
mysql> DROP DATABASE opentutorial;
Query OK, 0 rows affected (0.02 sec)

3. 스키마 목록 보기
mysql> SHOW DATABASES;
+--------------------+
| Database           |
+--------------------+
| information_schema |
| mysql              |
| opentutorial       |
| performance_schema |
| sys                |
+--------------------+
5 rows in set (0.01 sec)

4. 스키마에 입장하기
mysql> USE opentutorial
Database changed

5. 스키마에 테이블 만들기
mysql> CREATE TABLE topic(
    -> id INT(11) NOT NULL AUTO_INCREMENT,
    -> title VARCHAR(100) NOT NULL,
    -> description TEXT NULL,
    -> created DATETIME NOT NULL,
    -> author VARCHAR(15) NULL,
    -> profile VARCHAR(200) NULL,
    -> PRIMARY KEY(id)
    -> );
Query OK, 0 rows affected, 1 warning (0.02 sec)

6. 해당 스키마에 있는 테이블 확인하기
mysql> SHOW TABLES;
+------------------------+
| Tables_in_opentutorial |
+------------------------+
| topic                  |
+------------------------+
1 row in set (0.01 sec)
데이터베이스 및 테이블 관리2
1. topic이라는 테이블 열(목록) 만들기.
mysql> CREATE TABLE topic(
    -> id INT(11) NOT NULL AUTO_INCREMENT,
    // id 열은 최대 11자리 정수로 이뤄지며, 공란은 안되고, 자동적으로 숫자가 측정됩니다.
    -> title VARCHAR(100) NOT NULL,
    // title 열은 가변길이 100byte 로 구성되는 문자열이며, 공란은 안됩니다.
    -> description TEXT NULL,
    // description 열은 text로 구성되며, 공란도 가능합니다.
    -> created DATETIME NOT NULL,
    // created는 작성되는 날짜가 기제되며, 공란은 안됩니다.
    -> author VARCHAR(15) NULL,
    // author 열은 가변길이 15byte로 구성되는 문자열이며, 공란도 가능합니다.
    -> profile VARCHAR(200) NULL,
    // profile 열은 가변길이 200byte로 구성되는 문자열이며, 공란도 가능합니다.
    -> PRIMARY KEY(id)
    // 프라이머리 키는 id입니다
    -> );
Query OK, 0 rows affected, 1 warning (0.02 sec)

mysql> DESC topic;
+-------------+--------------+------+-----+---------+----------------+
| Field       | Type         | Null | Key | Default | Extra          |
+-------------+--------------+------+-----+---------+----------------+
| id          | int          | NO   | PRI | NULL    | auto_increment |
| title       | varchar(100) | NO   |     | NULL    |                |
| description | text         | YES  |     | NULL    |                |
| created     | datetime     | NO   |     | NULL    |                |
| author      | varchar(15)  | YES  |     | NULL    |                |
| profile     | varchar(200) | YES  |     | NULL    |                |
+-------------+--------------+------+-----+---------+----------------+
6 rows in set (0.00 sec)

2. topic 테이블 행에 1열 추가하기
mysql> INSERT INTO topic (title,description,created,author,profile) VALUES('MySQL', 'MySQL is ...', NOW(), 'sangkwon', 'developer');
Query OK, 1 row affected (0.01 sec)

3. SELECT * FROM 테이블 명을 입력하면, 해당 테이블의 모든 값을 출력.
mysql> SELECT * FROM topic;
+----+-------+--------------+---------------------+----------+-----------+
| id | title | description  | created             | author   | profile   |
+----+-------+--------------+---------------------+----------+-----------+
|  1 | MySQL | MySQL is ... | 2021-11-08 15:30:02 | sangkwon | developer |
+----+-------+--------------+---------------------+----------+-----------+
1 row in set (0.00 sec)

mysql> INSERT INTO topic (title,description,created,author,profile) VALUES('Oracle', 'Oracle is ...', NOW(), 'sangk
won', 'developer');
Query OK, 1 row affected (0.01 sec)

mysql> INSERT INTO topic (title,description,created,author,profile) VALUES('SQL Server', 'SQL Server is ...', NOW()
, 'sangkwon', 'developer');
Query OK, 1 row affected (0.00 sec)

mysql> INSERT INTO topic (title,description,created,author,profile) VALUES('PostgreSQL', 'PostgreSQL  is ...', NOW(
), 'sangkwon', 'developer');
Query OK, 1 row affected (0.01 sec)

mysql>
mysql> INSERT INTO topic (title,description,created,author,profile) VALUES('MongoDB', 'MongoDB  is ...', NOW(), 'sangkwon', 'developer');
Query OK, 1 row affected (0.00 sec)

mysql> SELECT * FROM topic;
+----+------------+--------------------+---------------------+----------+-----------+
| id | title      | description        | created             | author   | profile   |
+----+------------+--------------------+---------------------+----------+-----------+
|  1 | MySQL      | MySQL is ...       | 2021-11-08 15:30:02 | sangkwon | developer |
|  2 | Oracle     | Oracle is ...      | 2021-11-08 15:31:58 | sangkwon | developer |
|  3 | SQL Server | SQL Server is ...  | 2021-11-08 15:32:26 | sangkwon | developer |
|  4 | PostgreSQL | PostgreSQL  is ... | 2021-11-08 15:33:15 | sangkwon | developer |
|  5 | MongoDB    | MongoDB  is ...    | 2021-11-08 15:33:37 | sangkwon | developer |
+----+------------+--------------------+---------------------+----------+-----------+
5 rows in set (0.00 sec)

4. SELECT ~~ 열 이름 FROM 테이블명 입력하면, 해당 열만 확인할 수 있다.
mysql> SELECT id,title,created,author FROM topic;
+----+------------+---------------------+----------+
| id | title      | created             | author   |
+----+------------+---------------------+----------+
|  1 | MySQL      | 2021-11-08 15:30:02 | sangkwon |
|  2 | Oracle     | 2021-11-08 15:31:58 | sangkwon |
|  3 | SQL Server | 2021-11-08 15:32:26 | sangkwon |
|  4 | PostgreSQL | 2021-11-08 15:33:15 | sangkwon |
|  5 | MongoDB    | 2021-11-08 15:33:37 | sangkwon |
+----+------------+---------------------+----------+
5 rows in set (0.00 sec)

5. SELECT ~~ 열 이름 FROM 테이블명 WHERE 찾기 원하는 내용
mysql> SELECT id,title,created,author FROM topic WHERE author='sangkwon';
+----+------------+---------------------+----------+
| id | title      | created             | author   |
+----+------------+---------------------+----------+
|  1 | MySQL      | 2021-11-08 15:30:02 | sangkwon |
|  2 | Oracle     | 2021-11-08 15:31:58 | sangkwon |
|  3 | SQL Server | 2021-11-08 15:32:26 | sangkwon |
|  4 | PostgreSQL | 2021-11-08 15:33:15 | sangkwon |
|  5 | MongoDB    | 2021-11-08 15:33:37 | sangkwon |
+----+------------+---------------------+----------+
5 rows in set (0.00 sec)

6. ORDER BY id DESC => id를 내림차순으로 출력.
mysql> SELECT id,title,created,author FROM topic WHERE author='sangkwon' ORDER BY id DESC;
+----+------------+---------------------+----------+
| id | title      | created             | author   |
+----+------------+---------------------+----------+
|  5 | MongoDB    | 2021-11-08 15:33:37 | sangkwon |
|  4 | PostgreSQL | 2021-11-08 15:33:15 | sangkwon |
|  3 | SQL Server | 2021-11-08 15:32:26 | sangkwon |
|  2 | Oracle     | 2021-11-08 15:31:58 | sangkwon |
|  1 | MySQL      | 2021-11-08 15:30:02 | sangkwon |
+----+------------+---------------------+----------+
5 rows in set (0.00 sec)

7. LIMIT 숫자를 입력해서 원하는 갯수만큼의 정보를 확인.
mysql> SELECT id,title,created,author FROM topic WHERE author='sangkwon' ORDER BY id DESC LIMIT 2;
+----+------------+---------------------+----------+
| id | title      | created             | author   |
+----+------------+---------------------+----------+
|  5 | MongoDB    | 2021-11-08 15:33:37 | sangkwon |
|  4 | PostgreSQL | 2021-11-08 15:33:15 | sangkwon |
+----+------------+---------------------+----------+
2 rows in set (0.00 sec)

8. UPDATE 테이블명 SET '바꿀 내용' WHERE '바꿀 행에 대한 정보' 로 값을 바꿀 수 있다.
mysql> UPDATE topic SET author='duru' WHERE id=2;
Query OK, 1 row affected (0.01 sec)
Rows matched: 1  Changed: 1  Warnings: 0

mysql> SELECT * FROM topic;
+----+------------+--------------------+---------------------+----------+-----------+
| id | title      | description        | created             | author   | profile   |
+----+------------+--------------------+---------------------+----------+-----------+
|  1 | MySQL      | MySQL is ...       | 2021-11-08 15:30:02 | sangkwon | developer |
|  2 | Oracle     | Oracle is ...      | 2021-11-08 15:31:58 | duru     | developer |
|  3 | SQL Server | SQL Server is ...  | 2021-11-08 15:32:26 | sangkwon | developer |
|  4 | PostgreSQL | PostgreSQL  is ... | 2021-11-08 15:33:15 | sangkwon | developer |
|  5 | MongoDB    | MongoDB  is ...    | 2021-11-08 15:33:37 | sangkwon | developer |
+----+------------+--------------------+---------------------+----------+-----------+
5 rows in set (0.00 sec)

9. DELETE FROM '테이블명' WHERE '삭제할 행에 대한 정보' 를 통해서 삭제할 수 있다.
mysql> DELETE FROM topic WHERE ID=3;
Query OK, 1 row affected (0.01 sec)

mysql> SELECT * FROM topic;
+----+------------+--------------------+---------------------+----------+-----------+
| id | title      | description        | created             | author   | profile   |
+----+------------+--------------------+---------------------+----------+-----------+
|  1 | MySQL      | MySQL is ...       | 2021-11-08 15:30:02 | sangkwon | developer |
|  2 | Oracle     | Oracle is ...      | 2021-11-08 15:31:58 | duru     | developer |
|  4 | PostgreSQL | PostgreSQL  is ... | 2021-11-08 15:33:15 | sangkwon | developer |
|  5 | MongoDB    | MongoDB  is ...    | 2021-11-08 15:33:37 | sangkwon | developer |
+----+------------+--------------------+---------------------+----------+-----------+
4 rows in set (0.00 sec)

10. RENAME TABLE '테이블명' TO '바꿀 이름' 으로 테이블의 이름을 바꿀 수 있다.
mysql> RENAME TABLE topic TO topic_backup;
Query OK, 0 rows affected (0.02 sec)

mysql> SELECT * FROM topic_backup;
+----+------------+--------------------+---------------------+----------+-----------+
| id | title      | description        | created             | author   | profile   |
+----+------------+--------------------+---------------------+----------+-----------+
|  1 | MySQL      | MySQL is ...       | 2021-11-08 15:30:02 | sangkwon | developer |
|  2 | Oracle     | Oracle is ...      | 2021-11-08 15:31:58 | duru     | developer |
|  4 | PostgreSQL | PostgreSQL  is ... | 2021-11-08 15:33:15 | sangkwon | developer |
|  5 | MongoDB    | MongoDB  is ...    | 2021-11-08 15:33:37 | sangkwon | developer |
+----+------------+--------------------+---------------------+----------+-----------+
4 rows in set (0.00 sec)
스키마 내의 테이블 조합으로 정보 확인하기
중복되는 내용은 다른 테이블로 정보를 옮겨서 간략하게 표현하기

1. 다른 이름의 테이블 만들기
mysql> CREATE TABLE `author` (
    ->   `id` int(11) NOT NULL AUTO_INCREMENT,
    ->   `name` varchar(20) NOT NULL,
    ->   `profile` varchar(200) DEFAULT NULL,
    ->   PRIMARY KEY (`id`)
    -> )
    -> ;
Query OK, 0 rows affected, 1 warning (0.03 sec)

mysql> DESC author;
+---------+--------------+------+-----+---------+----------------+
| Field   | Type         | Null | Key | Default | Extra          |
+---------+--------------+------+-----+---------+----------------+
| id      | int          | NO   | PRI | NULL    | auto_increment |
| name    | varchar(20)  | NO   |     | NULL    |                |
| profile | varchar(200) | YES  |     | NULL    |                |
+---------+--------------+------+-----+---------+----------------+
3 rows in set (0.01 sec)

2. 두번째 다른 이름의 테이블 만들기
author_id는 author에서 입력한 id로 받아서 표현하기
mysql> CREATE TABLE `topic` (
    ->   `id` int(11) NOT NULL AUTO_INCREMENT,
    ->   `title` varchar(30) NOT NULL,
    ->   `description` text,
    ->   `created` datetime NOT NULL,
    ->   `author_id` int(11) DEFAULT NULL,
    ->   PRIMARY KEY (`id`)
    -> );
Query OK, 0 rows affected, 2 warnings (0.03 sec)

mysql> INSERT INTO `author` VALUES (1,'egoing','developer');
Query OK, 1 row affected (0.00 sec)

mysql> INSERT INTO `author` VALUES (2,'duru','database administrator');
Query OK, 1 row affected (0.00 sec)

mysql> INSERT INTO `author` VALUES (3,'taeho','data scientist, developer');
Query OK, 1 row affected (0.01 sec)

mysql> SELECT * FROM author;
+----+--------+---------------------------+
| id | name   | profile                   |
+----+--------+---------------------------+
|  1 | egoing | developer                 |
|  2 | duru   | database administrator    |
|  3 | taeho  | data scientist, developer |
+----+--------+---------------------------+
3 rows in set (0.00 sec)

3. author_id는 author의 id 값을 입력
mysql> INSERT INTO `topic` VALUES (1,'MySQL','MySQL is...','2018-01-01 12:10:11',1);
Query OK, 1 row affected (0.01 sec)

mysql> INSERT INTO `topic` VALUES (2,'Oracle','Oracle is ...','2018-01-03 13:01:10',1);
Query OK, 1 row affected (0.01 sec)

mysql> INSERT INTO `topic` VALUES (3,'SQL Server','SQL Server is ...','2018-01-20 11:01:10',2);
Query OK, 1 row affected (0.00 sec)

mysql> INSERT INTO `topic` VALUES (4,'PostgreSQL','PostgreSQL is ...','2018-01-23 01:03:03',3);
Query OK, 1 row affected (0.00 sec)

mysql> INSERT INTO `topic` VALUES (5,'MongoDB','MongoDB is ...','2018-01-30 12:31:03',1);;
Query OK, 1 row affected (0.00 sec)

mysql> SELECT * FROM topic;
+----+------------+-------------------+---------------------+-----------+
| id | title      | description       | created             | author_id |
+----+------------+-------------------+---------------------+-----------+
|  1 | MySQL      | MySQL is...       | 2018-01-01 12:10:11 |         1 |
|  2 | Oracle     | Oracle is ...     | 2018-01-03 13:01:10 |         1 |
|  3 | SQL Server | SQL Server is ... | 2018-01-20 11:01:10 |         2 |
|  4 | PostgreSQL | PostgreSQL is ... | 2018-01-23 01:03:03 |         3 |
|  5 | MongoDB    | MongoDB is ...    | 2018-01-30 12:31:03 |         1 |
+----+------------+-------------------+---------------------+-----------+
5 rows in set (0.00 sec)

mysql> SELECT * FROM author;
+----+--------+---------------------------+
| id | name   | profile                   |
+----+--------+---------------------------+
|  1 | egoing | developer                 |
|  2 | duru   | database administrator    |
|  3 | taeho  | data scientist, developer |
+----+--------+---------------------------+
3 rows in set (0.00 sec)

4. SELECT * FROM '출력할 테이블 명' JOIN '합칠 정보를 가진 테이블' ON '매칭할 데이터에 대한 정보'
mysql> SELECT * FROM topic LEFT JOIN author ON topic.author_id = author.id;
+----+------------+-------------------+---------------------+-----------+------+--------+---------------------------+
| id | title      | description       | created             | author_id | id   | name   | profile                   |
+----+------------+-------------------+---------------------+-----------+------+--------+---------------------------+
|  1 | MySQL      | MySQL is...       | 2018-01-01 12:10:11 |         1 |    1 | egoing | developer                 |
|  2 | Oracle     | Oracle is ...     | 2018-01-03 13:01:10 |         1 |    1 | egoing | developer                 |
|  3 | SQL Server | SQL Server is ... | 2018-01-20 11:01:10 |         2 |    2 | duru   | database administrator    |
|  4 | PostgreSQL | PostgreSQL is ... | 2018-01-23 01:03:03 |         3 |    3 | taeho  | data scientist, developer |
|  5 | MongoDB    | MongoDB is ...    | 2018-01-30 12:31:03 |         1 |    1 | egoing | developer                 |
+----+------------+-------------------+---------------------+-----------+------+--------+---------------------------+
5 rows in set (0.00 sec)

mysql> SELECT topic.id AS topic_id,title,description,created,name,profile FROM topic LEFT JOIN author ON topic.author_id = author.id;
+----------+------------+-------------------+---------------------+--------+---------------------------+
| topic_id | title      | description       | created             | name   | profile                   |
+----------+------------+-------------------+---------------------+--------+---------------------------+
|        1 | MySQL      | MySQL is...       | 2018-01-01 12:10:11 | egoing | developer                 |
|        2 | Oracle     | Oracle is ...     | 2018-01-03 13:01:10 | egoing | developer                 |
|        3 | SQL Server | SQL Server is ... | 2018-01-20 11:01:10 | duru   | database administrator    |
|        4 | PostgreSQL | PostgreSQL is ... | 2018-01-23 01:03:03 | taeho  | data scientist, developer |
|        5 | MongoDB    | MongoDB is ...    | 2018-01-30 12:31:03 | egoing | developer                 |
+----------+------------+-------------------+---------------------+--------+---------------------------+
5 rows in set (0.00 sec)
'~2022 작성 글 > TIL' 카테고리의 다른 글
| TIL 33 (순열/조합, GCD / LCM, 정규표현식) (2021.11.10) (0) | 2021.11.10 |
|---|---|
| TIL 32 (시간복잡도) (2021.11.09) (0) | 2021.11.09 |
| TIL 30 (React 에러 및 서버 구현 에러) (2021.11.05~2021.11.06) (0) | 2021.11.06 |
| TIL 29 (2021.11.04) (0) | 2021.11.04 |
| TIL 28 (정적, 동적 웹사이트, useContext)(2021.11.03) (0) | 2021.11.03 |


